Sunday, September 23, 2012

Day 13
Gluing the deck together  
1 hour spent
By Peter Selfors 
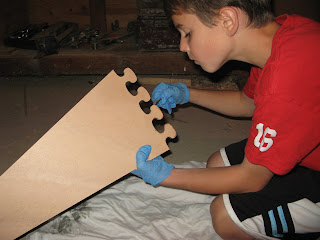
First I put epoxy on the jigsaw type edges.
Then I put it together.

Finally I clamped it together.

Sunday, September 9, 2012


Day 12
Planing the sheer clamps
Hours spent 1:30
By Peter Selfors 

I planed the sheer clams  at an angle so the deck could be glued on.

Gluing the deck beams together 
Minutes spent 30


I put epoxy on the end of the deck beam and put it in.
Again I put epoxy on the end of the boat and clamped it.


Sunday, August 26, 2012

Day FUN!!!
Going kayaking with the Chesapeake Light Craft kayaks [The company that I bought the kit from]  hosed by Rutabaga Paddle sports. 
Hours spent 2
By Peter Selfors
This is a picture of me riding the kayak I'm going to make.
Here's a link to the Chesapeake website: http://www.clcboats.com/
Day 10
Sanding the outside of the boat
3:00 Hours spent
By Peter Selfors
I used a 120 grit sandpaper.

Day 9
Fiberglassing the bottom and sides of the boat
2 hours spent
By Peter Selfors
This is a picture of the fiberglass laid on the boat.

This is a picture of me putting epoxy on the fiberglass.

Tuesday, August 21, 2012

Day 8 
Glue and sanding the seams
Hours spent 4:00
By Peter Selfors
 I used epoxy mixed with wood flour to glue the seams.


 I put tape by the seams so the epoxy wouldn't get on the rest of rest of the boat.
 I sanded the seems until they were smooth and round. I used 3 different grits 60, 120 and 220.
Day 7 
Gluing the deck beams together
30 min.
By Peter Selfors
I glued two pieces of arched wood together. Then I clamped them.

Friday, August 3, 2012

Day 6 July 2012
Hours spent 4 and a half
Epoxying the fiberglass to the inside of the boat.
By Peter Selfors
It was a really messy job, so I couldn't take pictures. First I used thick epoxy mixed with wood flour. It was peanut-butter-like consistency. Then I laid strips of fiberglass on the inside joints of the boat. Next I used epoxy resin and epoxy hardener and put it on the fiberglass. I repeated the process in the cockpit with a big sheet of fiberglass over the strips. Finally, I let it harden.

Monday, July 30, 2012

Day 5 July 29 2012
 3:00 spent
 Wiring the boat together
By Peter Selfors
I cut wires so I could wire the pieces of the boat together.
This is a picture of  the bottom of the boat wired together.

This is a picture of  the sides of the boat wired together.


This is a picture of  the inside of the boat wired together.


Saturday, July 28, 2012

Day 4 July 27 2012 
Hours spent 2:00
Gluing the sheer clamps to the sides of the boat
By Peter Selfors
First I had to put gloves on so epoxy wouldn't get on my hands.

Then I glued it together and clamped it.


Sunday, July 22, 2012

Day 3 July 22 2012
3 and a half hours spent
By Peter Selfors
I sanded down the bottom and the sides of the boat.

I also sanded down any extra epoxy.


Saturday, July 21, 2012

Day 2 July 20 2012
Hours spent 2 
By Peter Selfors
On the second day I glued the sides of the boat together and the sheer clamps together [sheer clamps make it so that you connect top and the sides of the boat together].
This is a picture of the mustered consistency epoxy that we mixed in an empty yogurt can. 
This is the picture of the jigsaw like ends

I screwed in a board were I glued together the jigsaw like ends to have a better glue.


Thursday, July 19, 2012

Day 1 July 19 2012
Hours spent 1
By Peter Selfors
Gluing the bottom of the boat together.


I had to mix epoxy resin, hardener and cell-o-fill together until it was a mustard consistency. Then I spread it on the jigsaw like ends and put the pieces of the bottom of the boat together.